49. Contributing#
To run the environment look at the howto guild. This chapter is intended to be a guide to people collaborating with us on developing the open OS textbook. We first provide links to background information on the tools used and describe some of our design choices. Next, we provide a tutorial on how to get started with the environment if you are a collaborator of the authors, followed by information on how to author content. Finally, we have a list of main contributors.
49.1. Set Up#
You will want to create your own forked repository from the openos repository . If you already have your own container/environment used to build and publish the book, then you can clone your forked repository there and skip the image creation section. Otherwise, clone it locally.
Note
There are three important folders that you will use: /containers, /content, /books. The containers folder will hold all of the configuration and the Dockerfile for your docker image. The content folder will hold all of the .ipynb files plus additiional files used to structure your book. The books folder contains the makefile to build and publish your book from the content folder.
49.2. Create Your Image#
Navigate to the /containers/container/base folder. This is where you can make any modifications to your image. Navigate back to /containers/container and type “make build” to build your image. This will take around 10-15 minutes, so make sure you have no syntax errors. Type “make publish” to publish to your image registry.
Warning
You will need to have the Docker daemon running in the background to build your image.
49.3. Build Your Book#
Navigate to the /content folder. Here is where all of your book content will be stored. Please visit the Jupyter Book website to see a more detailed description of book format and markup syntax.
Once your book is ready, In your container environment, navigate to /books/textbook and type “make build” to build the textbook. It will create a _build folder in the same directory containing all of the static assets needed for the website. Type “make pub” to publish to your GitHub Pages site.
Note that you are publishing the book to your forked repository’s GitHub Pages site. If you are happy with your changes, commit them and submit a pull request to add your changes to the original repository.
Note
We recommend you look at this notebook as the best example of generating content, and we will make a valiant attempt to keep it up to date as we gain more experience. Having said that, the file system chapter today probably has a better set of examples
Warning
It is really easy to waste months with all the degrees of freedom with this authoring model, and we will try to be prescriptive on how we use the tools, so we recommend you jump straight to the tutorial directions on authoring material.
Note
This is an example of a note, in a warning, in a note.
At the end of this section we have links to various reference materials, for example, sections of Jonathan’s textbook that we plan to steal materials from.
49.4. Resources to look at#
jupyterbook: : look here for basic instructions on authoring; we are basically using jupyterbook in a prescriptive fashion for the static content.
myst markdown: we plan on authoring much of this with myst, although the current implementation of myst for jupyterbook is experimental.
tags on cells: use this to, for example hide inputs
49.5. Design choices#
All real content is in the “content” directory
textbook_toc.yml - the table of contents for the book
The images (png, jpg, etc) should all be in their respective section folder in the images directory
The quizzes should all be in the quizzes directory
The source code being shown/ran should all be in the src directory
We are creating one subdirectory for each chapter that will contain:
book materials; for now, its a single file for book; likely will eventually break into sections
all corresponding lectures, referred to as lecture notes
all corresponding lab materials
49.6. Authoring content#
49.6.1. Using jupyterlab#
Will put various hints here on what we find works, although for the most part like any editor, you will gradually experience what works best for you.
there seems to be just one file browser, I tend to open multiple links to the textbook:
for the place I am actually authoring
for a browser to move around, look at examples
for the rendered book/result
we might want to build some simple vidios/todos
49.6.2. Adding figures#
Use draw.io for open source software, I download the desktop version from here since it seems more reliable. You can just download the image to your desktop, edit it there, and upload it again. You can Please use png as the source type of the file, rather than the default drawio; in this case it will create a XXX.drawio.png file, where the diagram is embedded in the png, so you can both dispay it, and edit it. This means you can not only continue to edit the file directly, but can also include exactly the same file in a figure.
Tricks I have found in using this:
with the desktop version you can directly copy images browser see this vidio
I tend to use layers, for animation, then upload it and generate multiple png files form the same image
You very much want to export the picture as high-resolution, by using a large zoom, see Figure Fig. 49.3
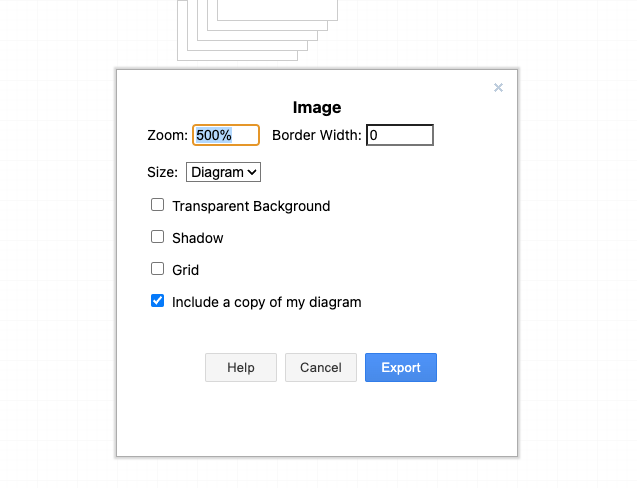
Fig. 49.1 Making images high resolution.#
If you use the drawio embedded in the notebook environment, to generate a png rather than using the file export from the figure, use the command palette from jupyter “view” menue as shown in figures Fig. 49.2 and Fig. 49.3.
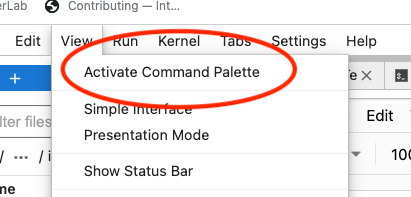
Fig. 49.2 Activate Command Palette to export drawio figure as png.#
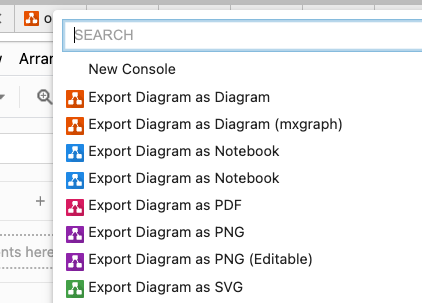
Fig. 49.3 Export drawio figure as png.#
Note, this is strongly discouraged, since I don’t see any way to fix the resolution so that the images don’t suck. I end up exporting from draw.io at 500% to get pictures to look reasonable.
We use the figure directive in myst, so the following:
```{figure} ../images/osstructure-1.drawio.png
---
width: 50%
name: fcontrib:fig:examp
align: right
---
A caption for figure
```
Results in this:
As shown in figure A caption for figure, most operating systems today have …
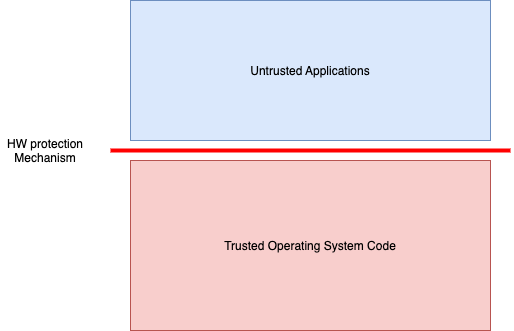
Fig. 49.4 A caption for figure#
For more on figures look at this reference.
49.6.4. RISE presentations.#
49.6.4.1. Developing one#
you can find an example with templates for slides in the “content/contributing” directory under L01-example notebook.
you should create a symbolic link to the lecture note css file (content/css/ln.css) with the name of your slide (e.g., L01-example), and commit it to the repo
to determin which cells are slides, versus notes, versus subslides… edit the tags
49.6.4.2. Coverting google slide presentation#
download google slidedeck as a powerpoint
open powerpoint in keynote
export to images,
set to do an image for each stage of animations
make sure png and transpartent backgrounds
upload to book directory “content/from-google-slides”
create new subdirectory (e.g., MM01)
upload all images generated into that directory
in directory, e.g., mm, type
{code-block} ../python/mkln MM-L1 ../from-google-slides/MM01you should now have a rise presentation titled MM-L1, where each image is a seperate slide
49.6.4.3. Running one#
press lower case “t”, in screen show for speaker notes; my experience is that only works if you start the note before going to full screen on the slide
49.6.5. Useful tricks and stuff we should try#
as add-on to google doc, can convert google doc to markdown using docs to markdown
worth downloading google slides and then converting to markdown to get a start on slides and figures we want to include
49.7. References#
Stuff to steal from look at, pasting here
xv6 - simple OS from MIT - https://pdos.csail.mit.edu/6.828/2012/xv6.html
book from peter
book three easy steps or whatever, ..
Style here from jonathan hiding content: #
Order in which to read book -
what is introductory content, what is detail…
Figure out how to put in tags in book, so that the tags will reflect…
Test if you can put in reading order in different ways, can you put in maps, or can you
several curated reading order
We have asked you to take on faith, we want to give you to learn by trying…
look at 14. SLS Lecture 14 : Assembly using the OS
hello world in assembly in 14.5.2
experience perspective - top down, experiential, repeating multipel times…
$ which date
/usr/bin/date
$ file /usr/bin/date
/usr/bin/date: ELF 64-bit LSB shared object, x86-64, version 1 (SYSV), dynamically linked, interpreter /lib64/ld-linux-x86-64.so.2, BuildID[sha1]=731c2a7a56b2d07e67ac99b4960ec700b3faad68, for GNU/Linux 3.2.0, stripped
49.8. Contributors#
We hope that many will contribute to this over time, and the github community page should show recent ones. A major way to contribute is to submit issues (see here) when you see a problem. Major contributors and editors for parts of the book are:
49.8.1. Editors in charge of specific sections#
Orran Krieger: Editor of this version, file systems, getting started
Larry Woodman: Memory Management
Eric Munson: Scheduling
Angela Demke Brown: Synchronization
Sadie Allen: Tools
49.8.2. Major contributors#
Peter Desnoyers: provided much of the content that we seeded this book with from his open source OS book for northeastern graduate course.
Jonathan Appavoo: who’s book Under the Covers: The Secret Life of Software both inspired this book and from which we have stolen content and many ideas.